Learn to make pull requests using GitHub Codespaces and contribute to open source
There are several ways to make pull requests. In this blog post, you will learn how to make a pull request in practice using GitHub Codespaces and making a pull request to GitFichas.
GitFichas
GitFichas is now an open source project and is currently undergoing a migration that will bring several improvements. For this, every existing card needs to be migrated to the new format using Mermaid. As the best way to learn is by practicing, this blog post will show you how to do everything in practice.
It’s worth remembering that the steps here are just one way to make pull requests, and the only real recommendation is to follow the contribution guide for each project, usually found in the CONTRIBUTING.md file, present in most open-source projects. The contribution guide for GitFichas can be found here.
GitFichas and its structure
A bit of context first. To start contributing, it’s important to learn about the project and its structure. In the case of GitFichas, there are two types of cards: command cards or concept cards.
- Command cards: explains a command like “
git add -p” or “git commit --allow-empty”; - Concept cards: explains concepts related to git, versioning, and related topics, such as “pull requests” and “conflicts”;
Each type of card has a similar collection of fields, but with specific fields for each type. These fields will be used by mermaid to generate the visualization. All the fields to be used for cards are in the contribution guide.
Speaking of the repository’s folder and file structure, cards in Portuguese are in the _posts/ folder, and cards in English are in the en/_posts folder.
Both Portuguese and English cards follow the same naming pattern <YYYY-MM-DD>-<NUMBER>.md. The date is used for ordering the cards on the site while the number corresponds to, well, the card number.
Otherwise, the files follow the pattern of blogs written using Jekyll, a static site generator made in Ruby. Yes, GitFichas is essentially a blog, it uses Liquid for templating which turns into the pages you see on the site.
Additionally, it’s worth mentioning that the site is built and served by GitHub, and you can see a preview of the changes thanks to Netlify.
Requirements
You will need:
- A GitHub account.
Yes, that’s it. If you know git, following the step-by-step will be easier, but if you are still learning git, you will still be able to follow along.
Where to Start
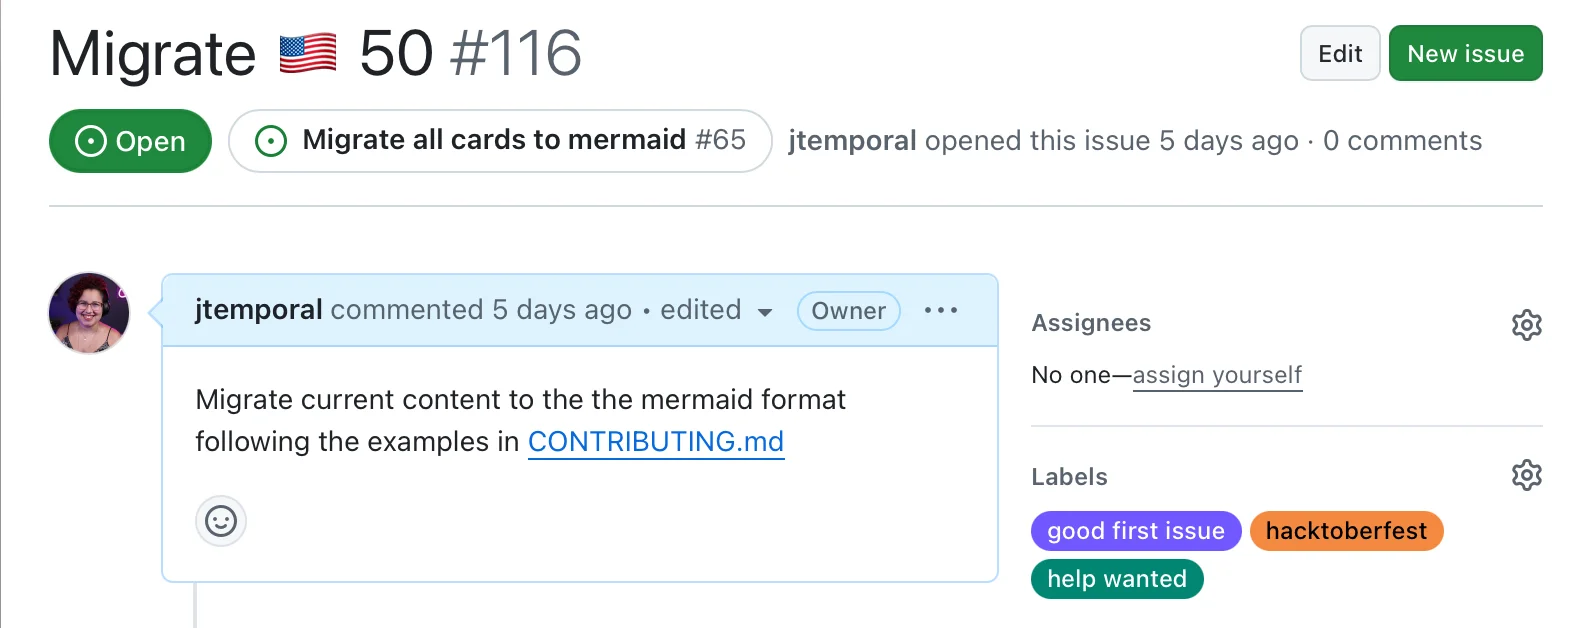
You already have the project to contribute to, and you’ve taken a look at the contribution guide. Now you need to choose an issue in the GitFichas repository. Choosing an issue will help you identify cards that have not yet been migrated to the new format and know what name to give your branch.
Here, I will use card #050 in English. The migration of this card is noted in issue #116.
With the issue chosen, we can start working. The steps are:
- Fork the repository;
- Create a new branch;
- Start the Codespace;
- Make the changes;
- Check the changes by running the site;
- Submit the pull request.
1. Fork the repository
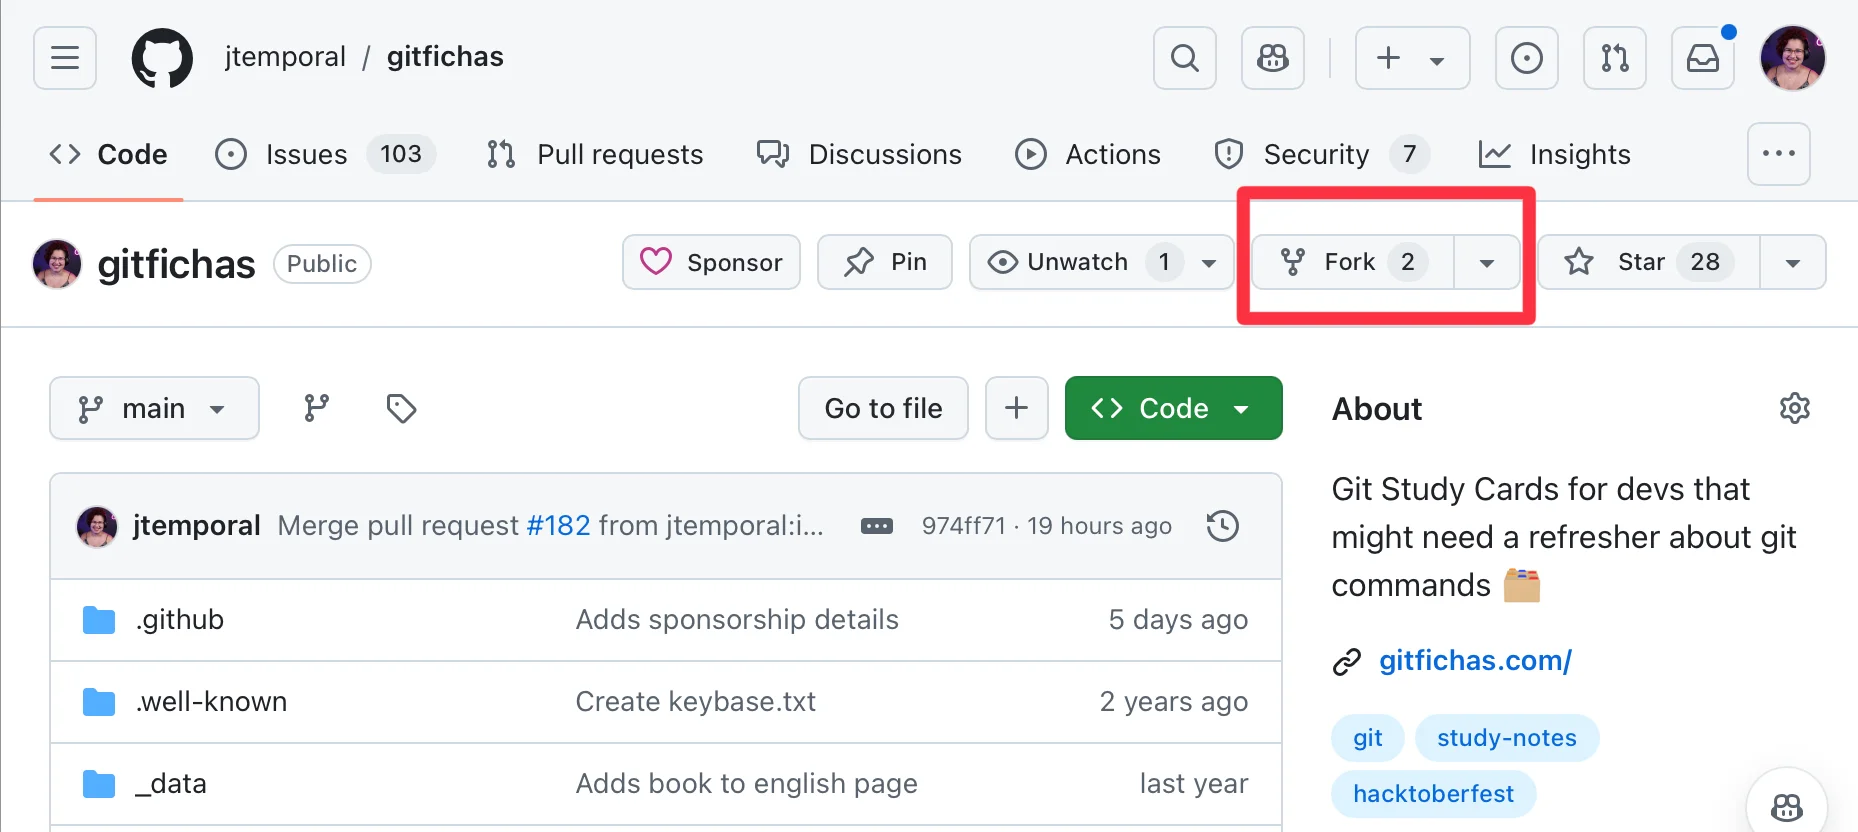
Create a fork of the repository in your account, you can click this link here or in the GitHub interface on the repository, click the “Fork” button.
Remember to click “Create” on the next page to create your fork.
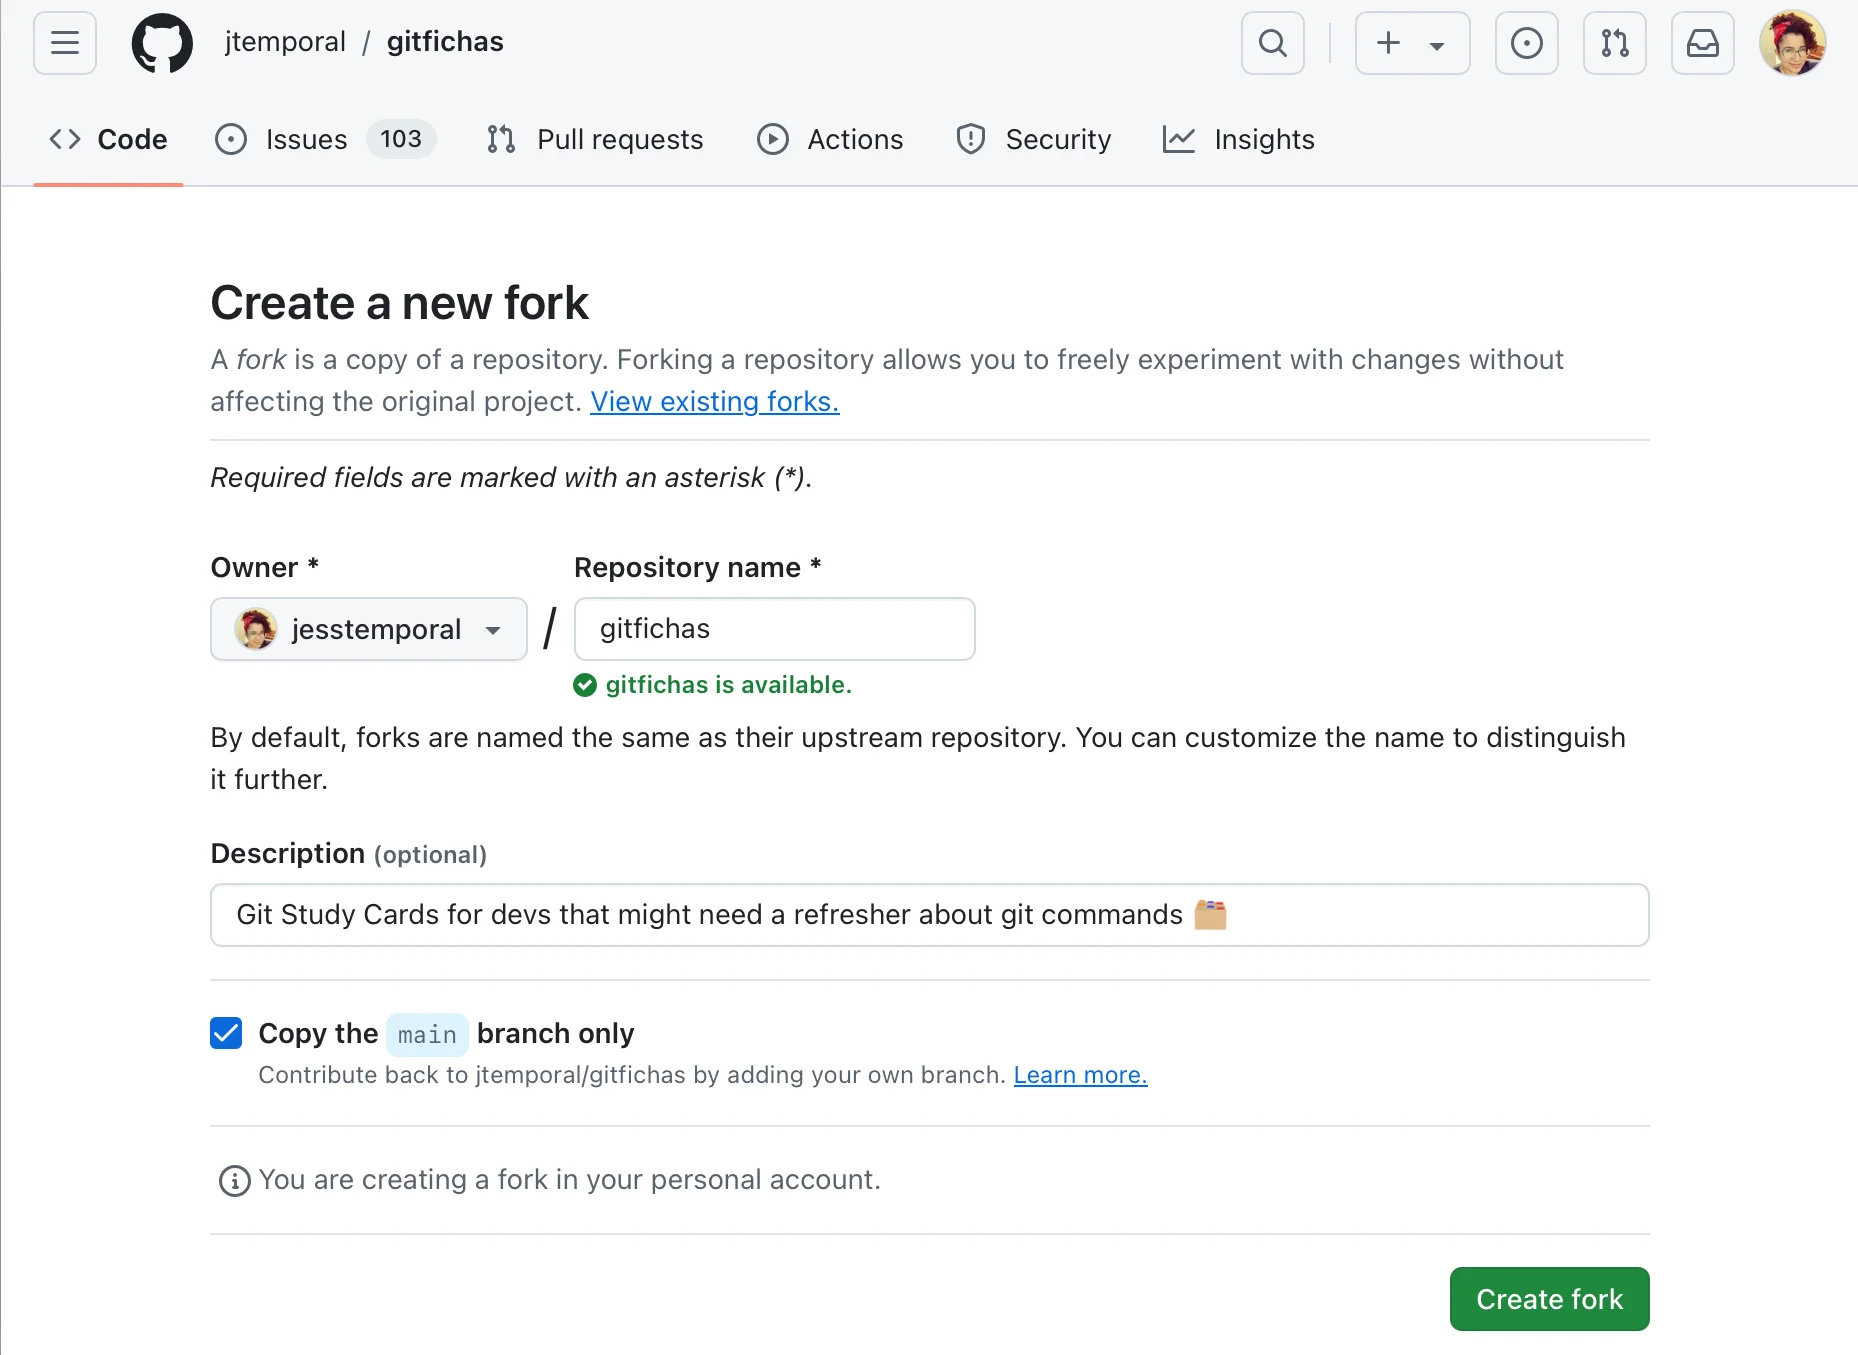
This will create a copy of the original repository in your account, allowing you to make your contributions since a fork in your account will give you full editing powers.
2. Create a new branch
After forking the repository, it’s always important to create new branches, one for each contribution. Using branches instead of working directly on main will allow you to make multiple contributions at the same time.
The name of your branch should follow what is described in the repository’s contribution guide. In the case of GitFichas, the pattern to follow is <username>-<issue or description>.
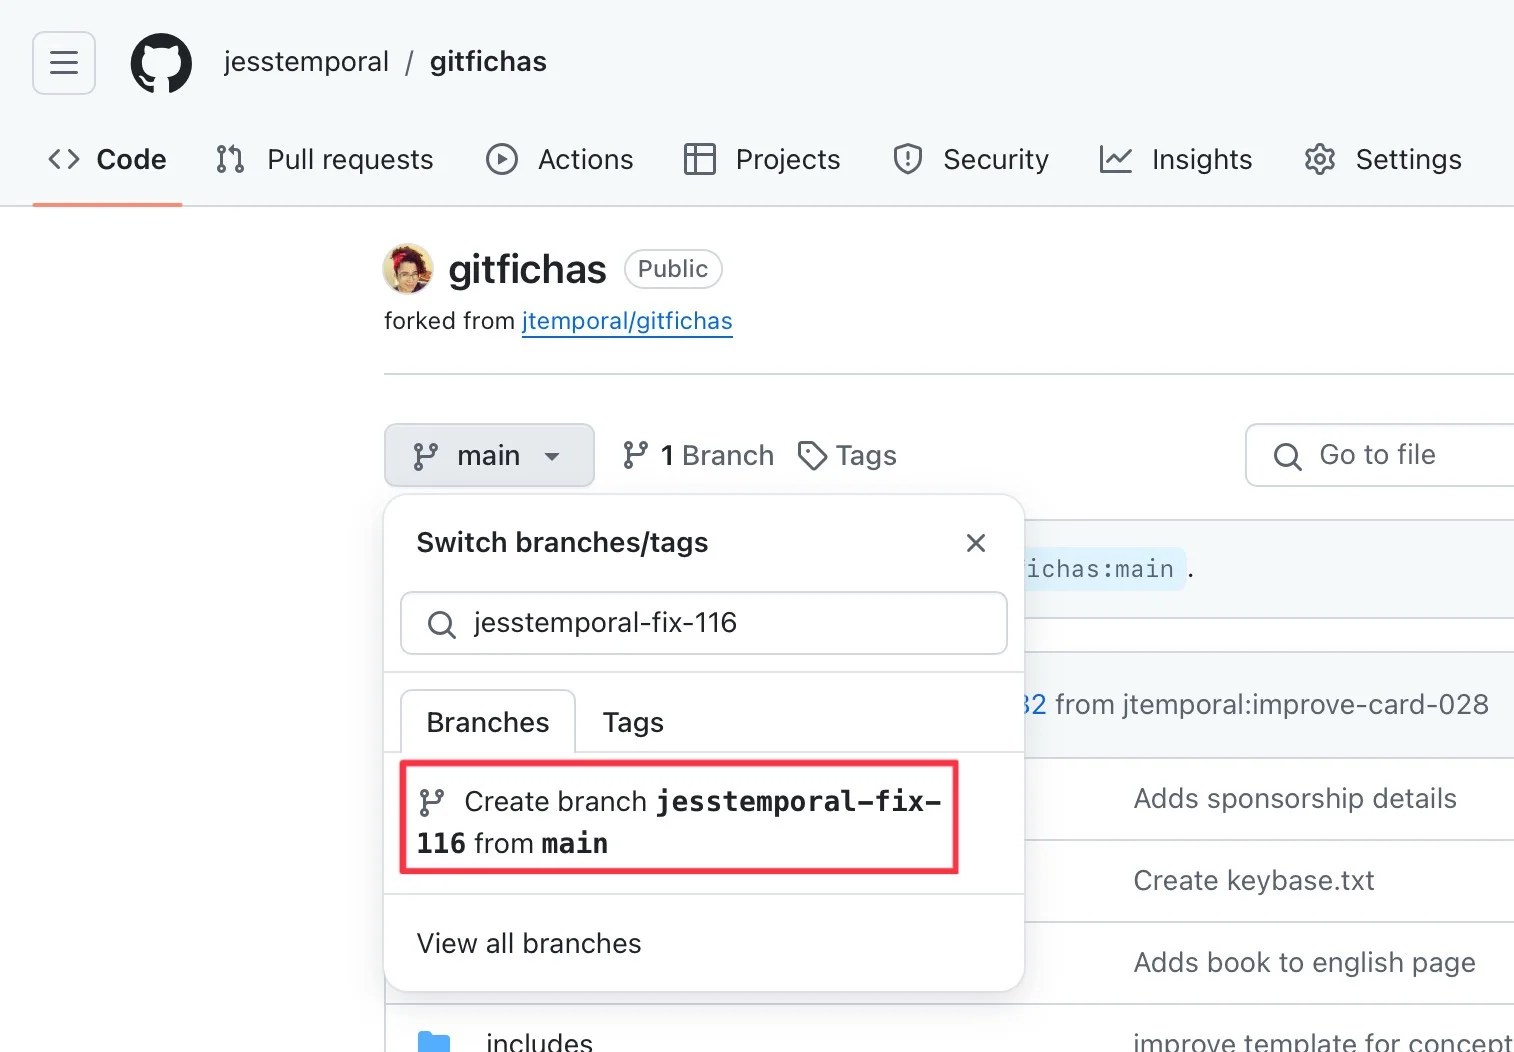
Since our issue is #116 and my username is jesstemporal, the branch name will be jesstemporal-fix-116.
To create the branch with this name, click on the branch selector that indicates the current branch main and type the name of the new branch in the search box. This will show the creation button with the name you typed, as shown in the image above.
3. Start your GitHub Codespace
Codespaces are great because you can get a complete development environment in just a few minutes, as long as you have an internet connection. Another advantage is that Codespaces are ephemeral and allow you to have a completely isolated environment without needing to install anything on your machine.
Click on <> Code and in the Codespaces tab, click the creation button as shown in the image below.
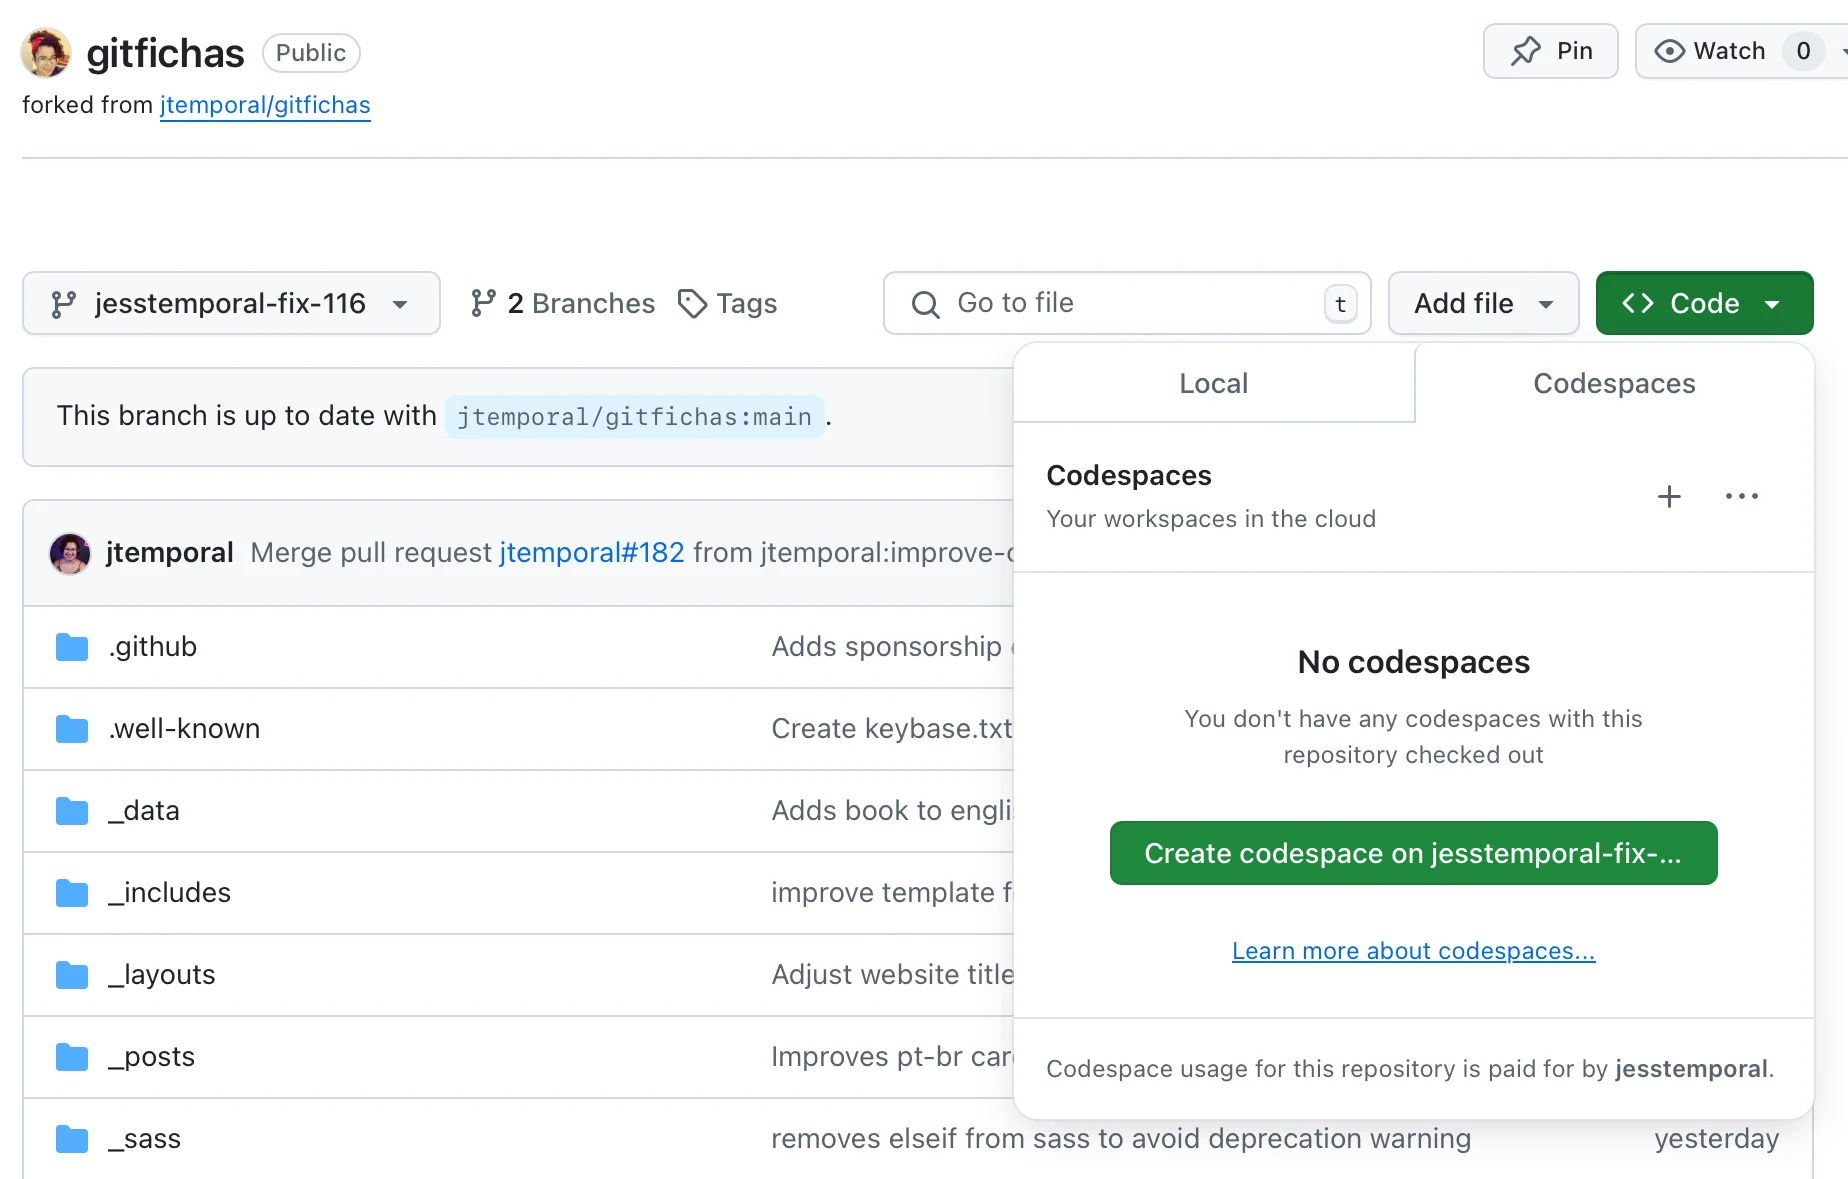
This should open a new tab in your browser. Creating a new Codespace may take a few seconds, but once it’s ready for use, you should see something similar to the screen below.
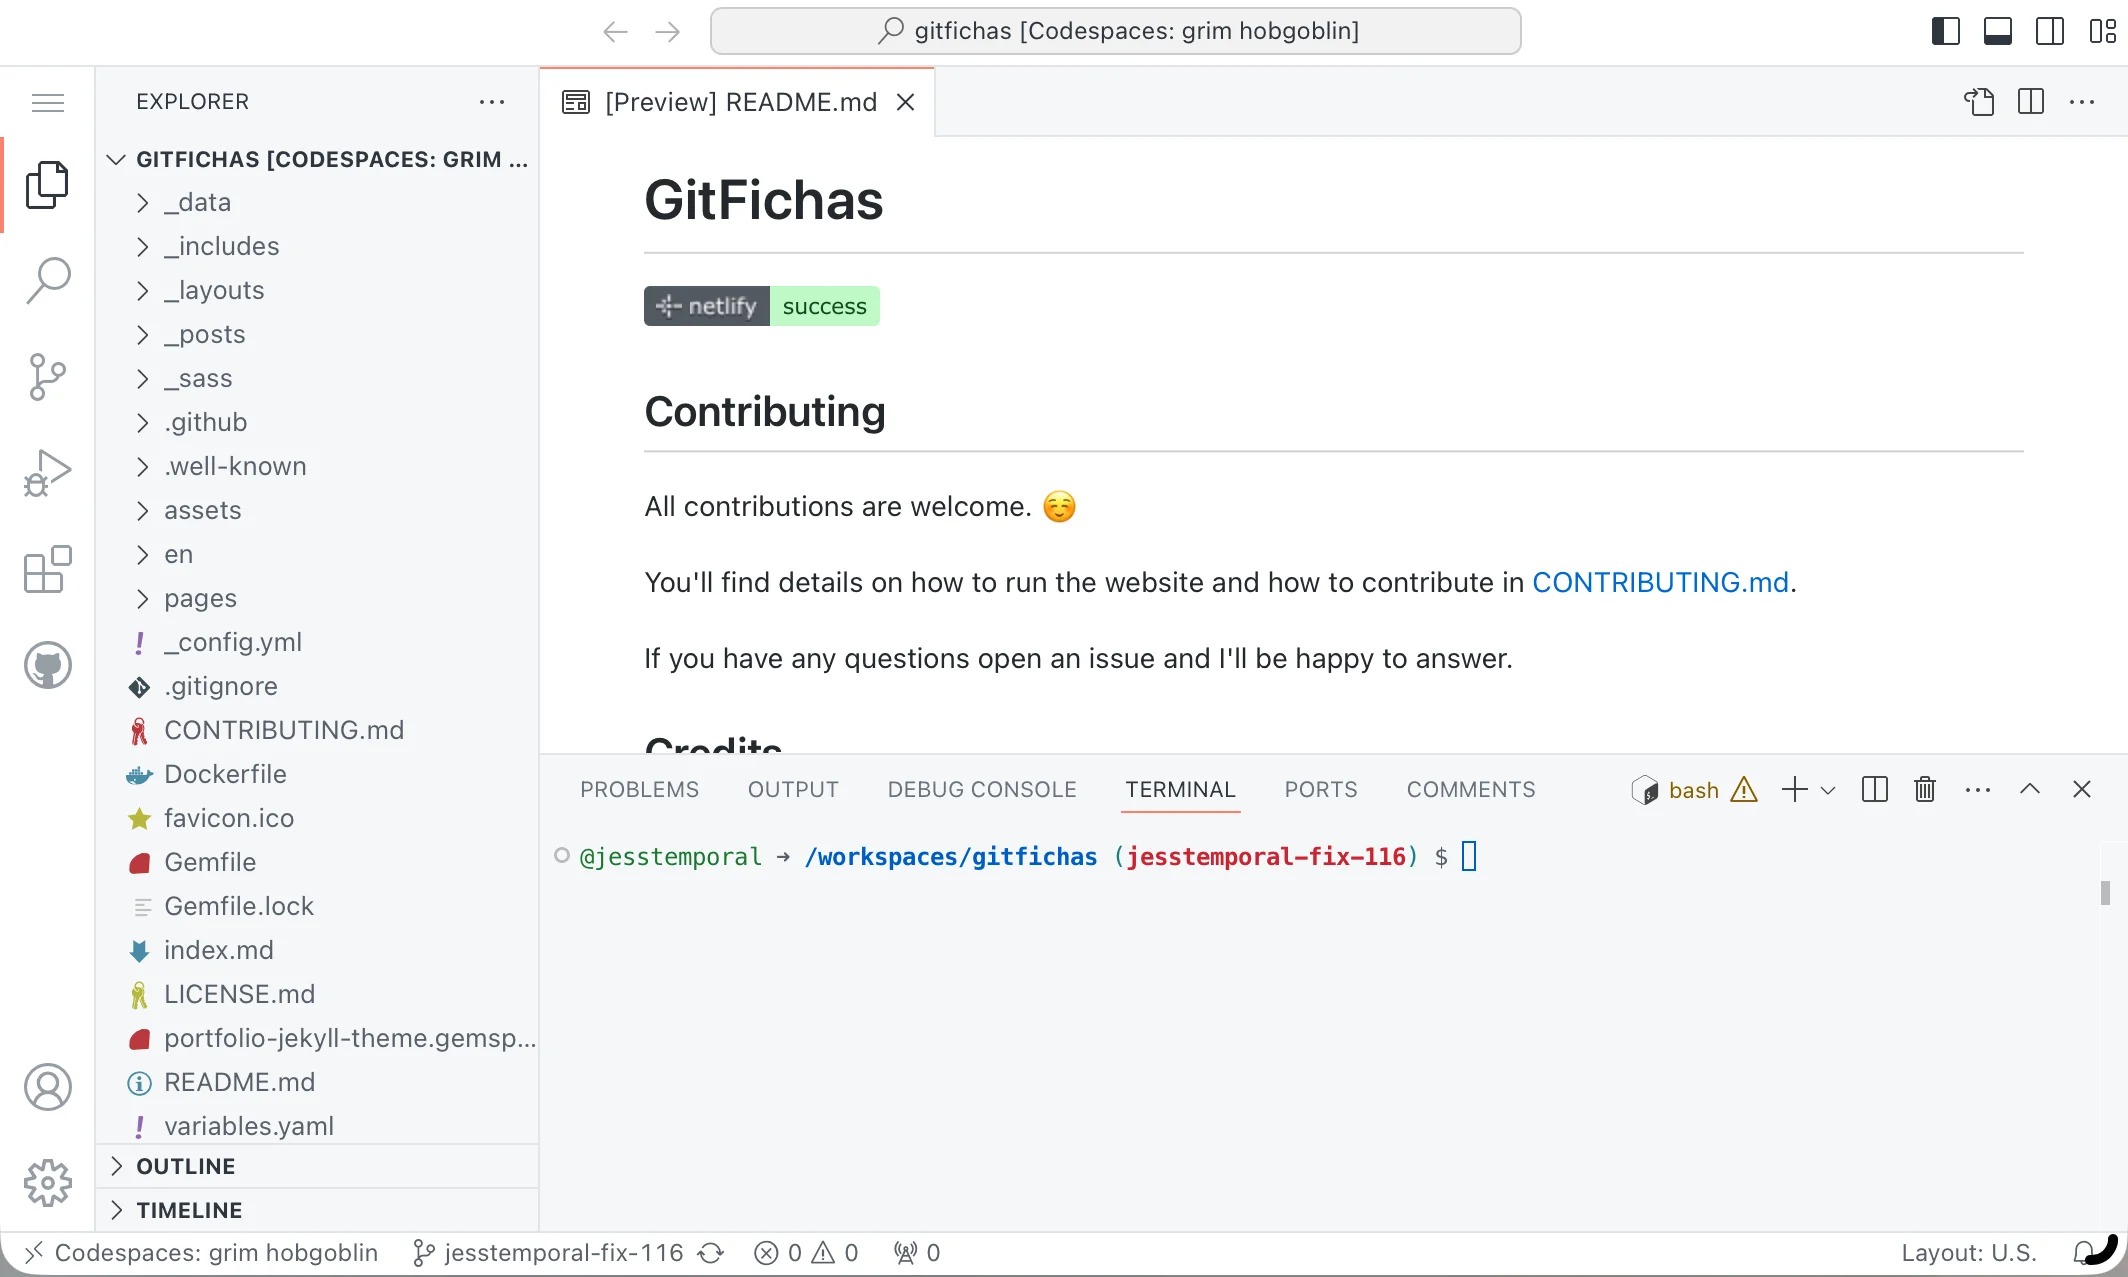
It’s time to make the changes.
4. Make the changes
Since we are editing card #050 in English, it is located in en/_posts/2023-08-04-050.md. When you open the file, you will be able to see the current content of the card and start making the changes.
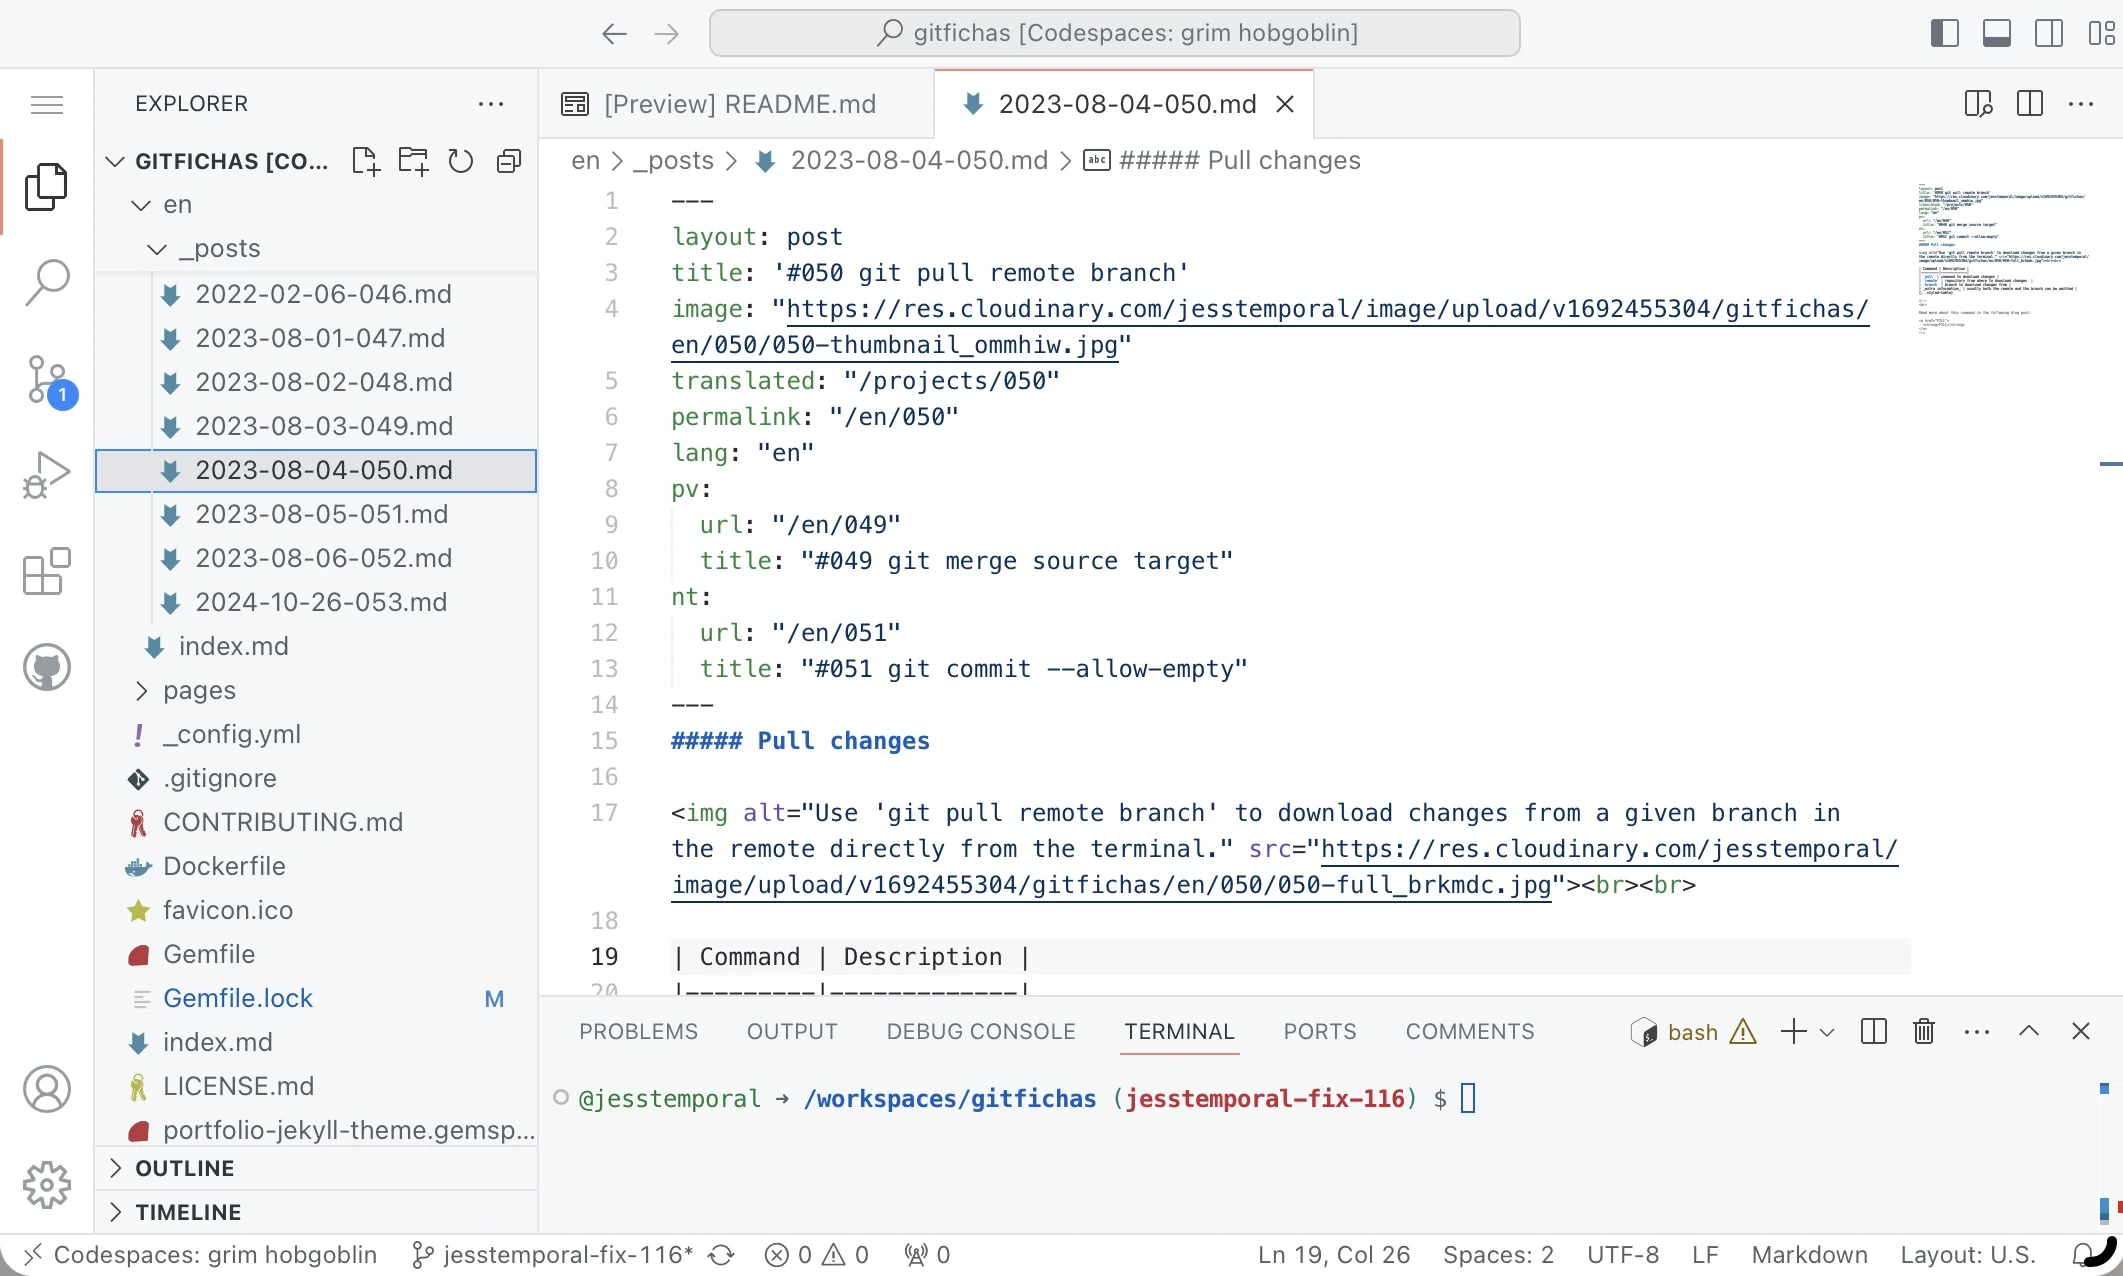
The easiest way to know what changes to make is to look at what exists in the current card and copy the content from the page gradually, following the examples in the contribution guide.
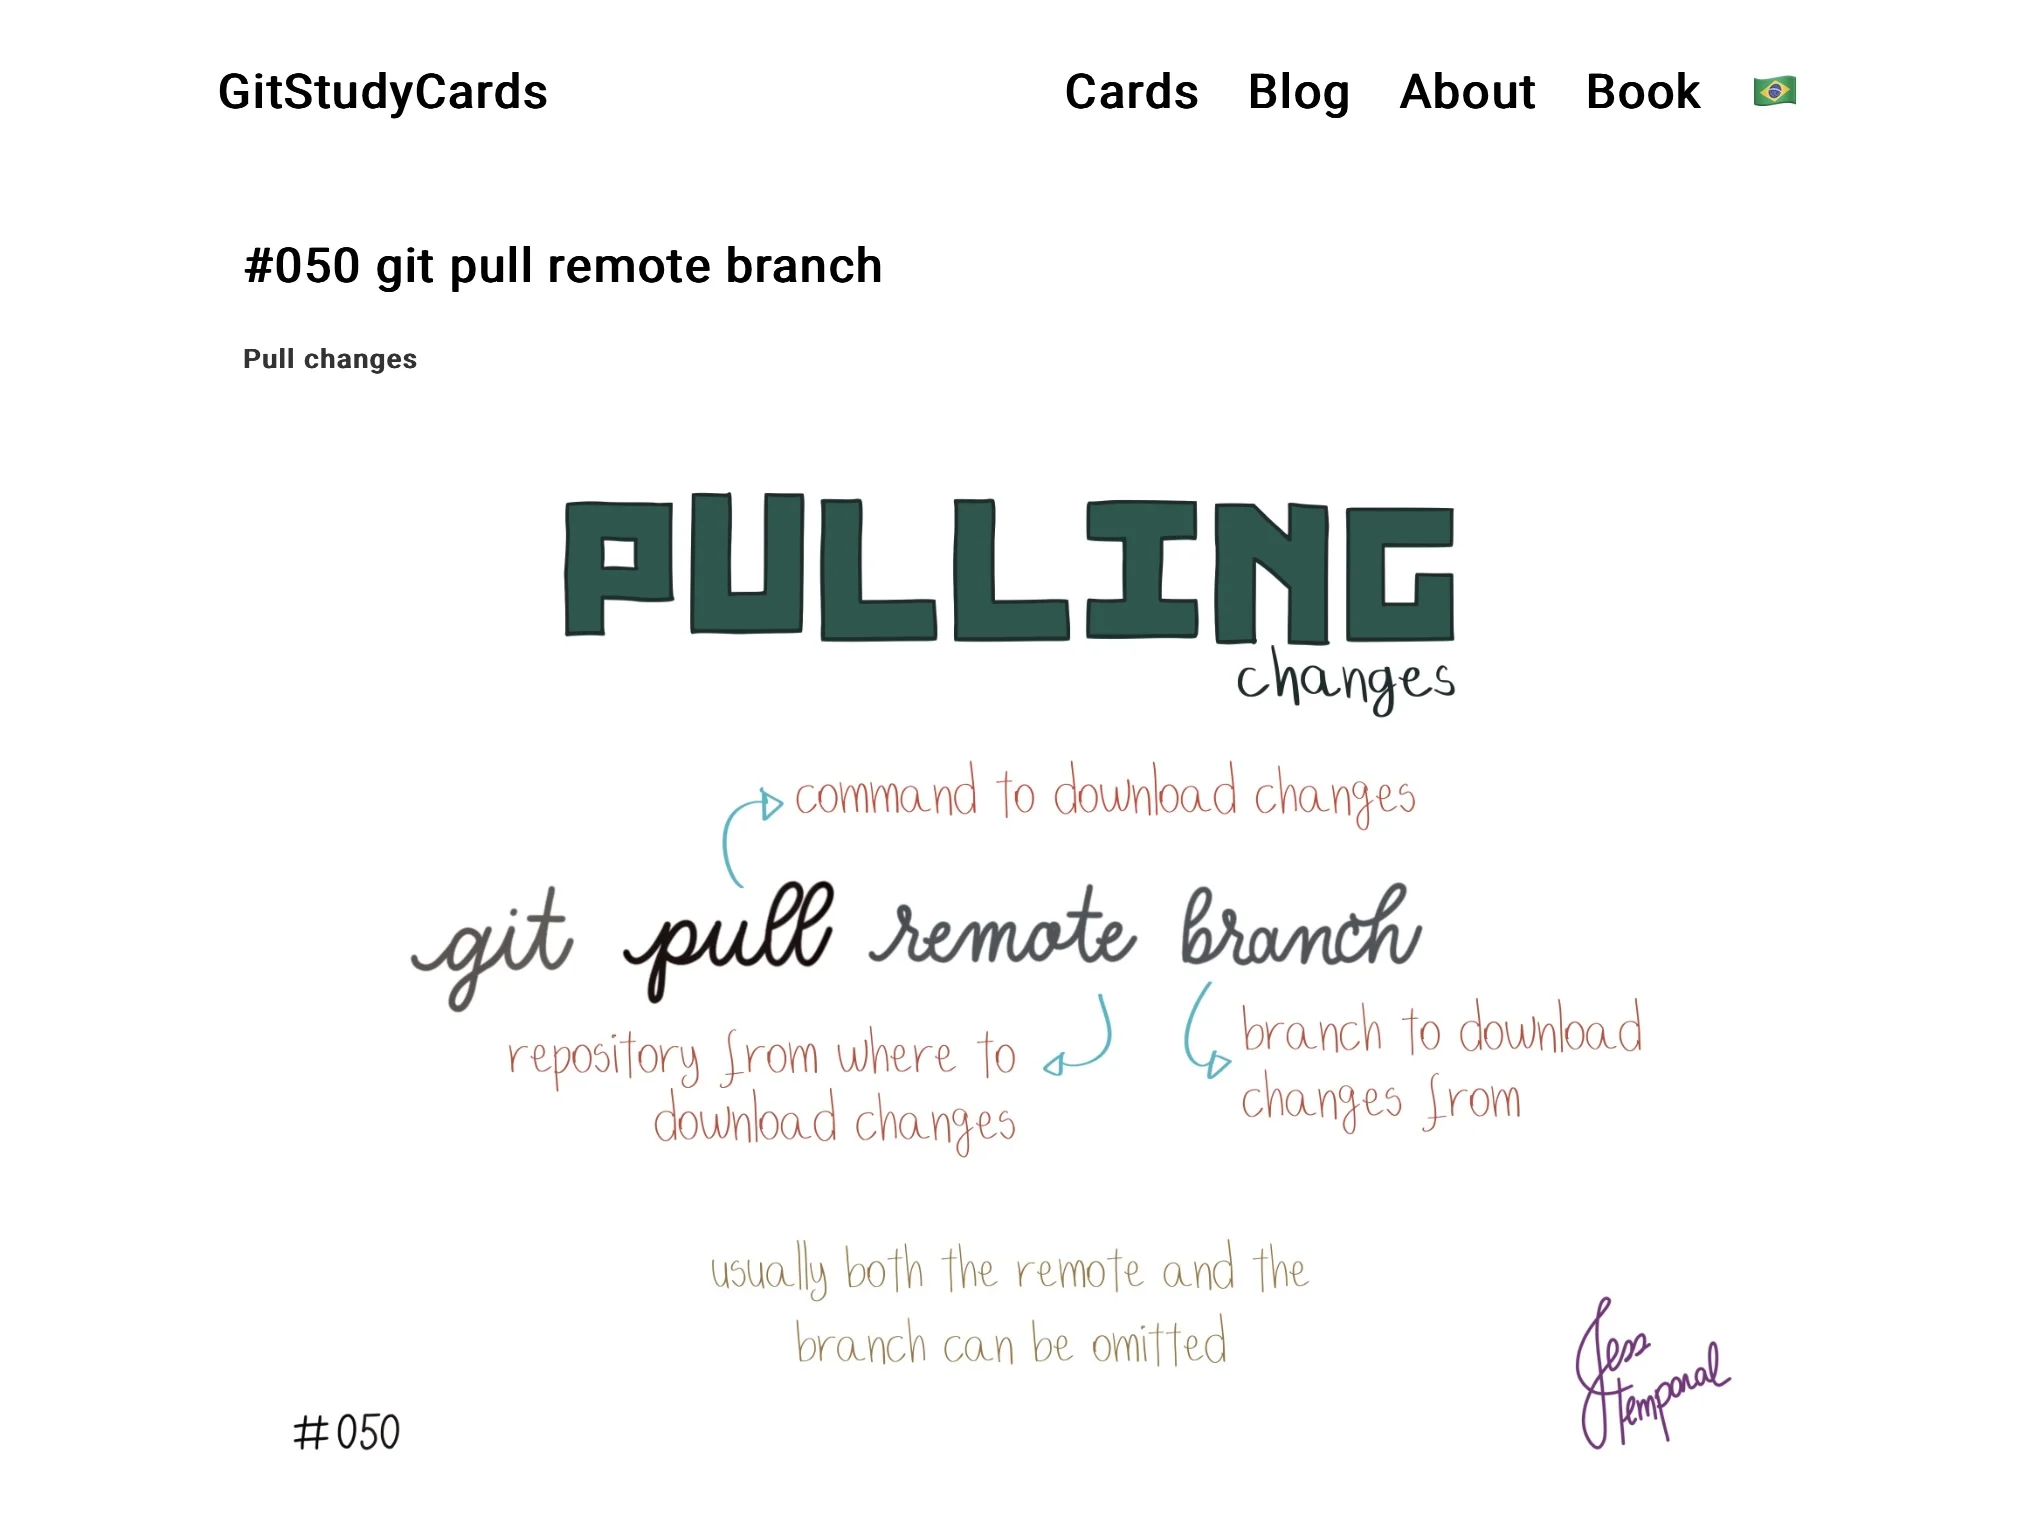
Card #050 appears on the page as follows:
Composition of a card
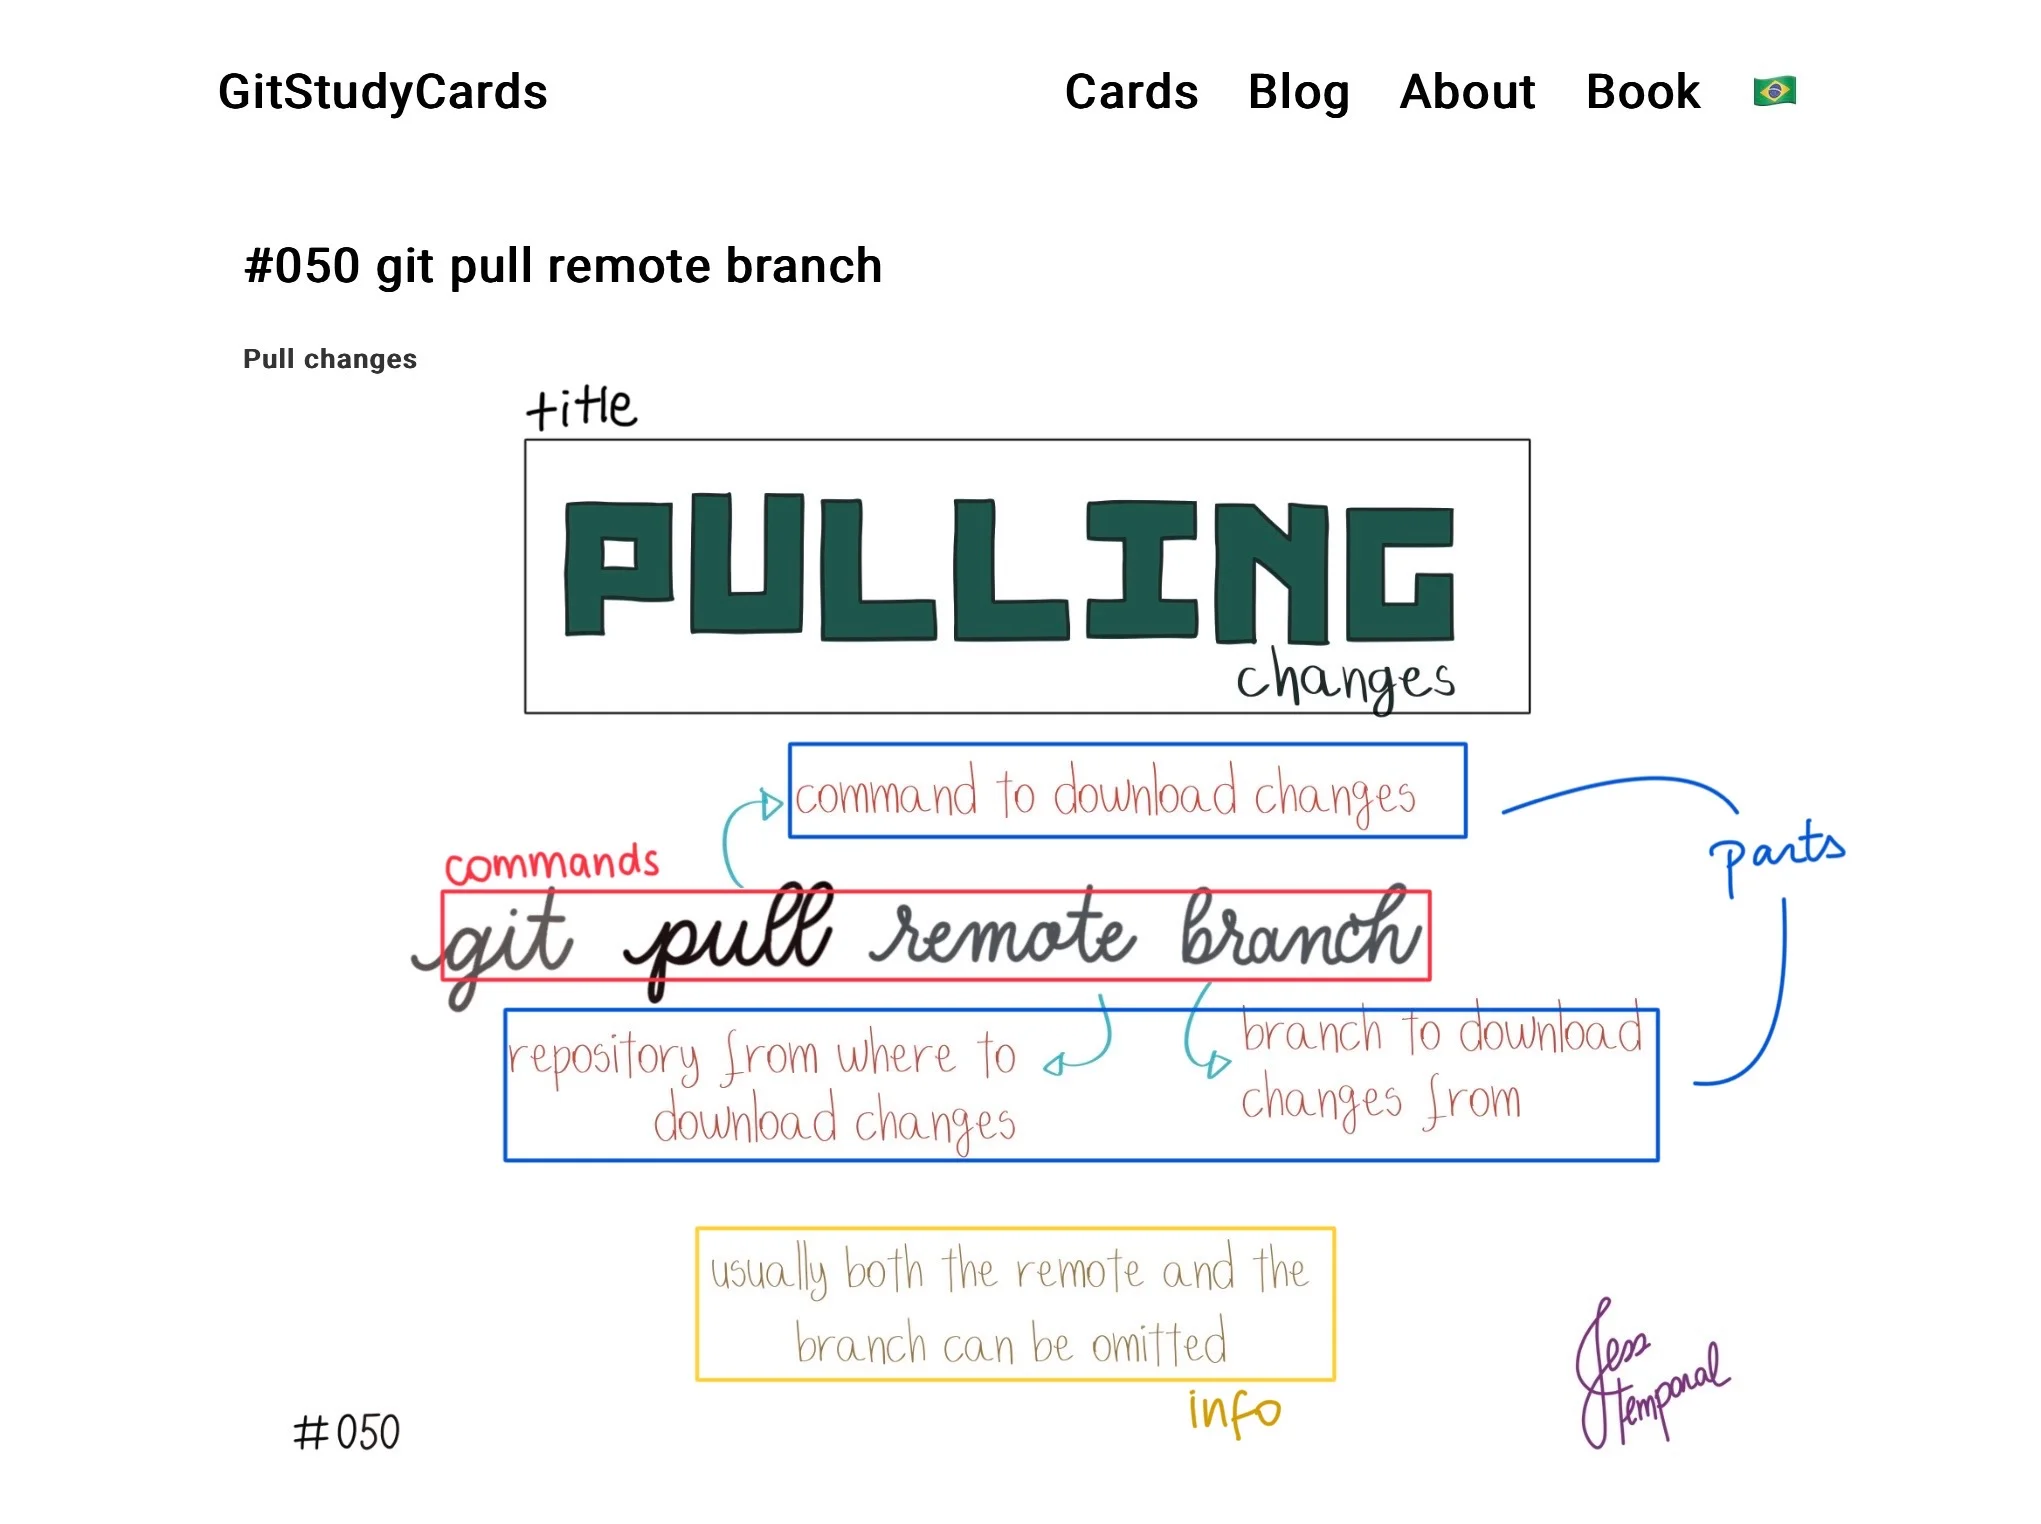
Let’s understand what makes up a card:
- Title: The top part of the card. In this case, “Pulling changes” titles are composed of 3 parts:
- Pre-title: everything written before the square letters, in this case, there is no pre-title;
- Main: the main part of the title, in card 50 it is “Pulling”;
- Subtitle: everything that comes after the main part, in this case, “changes”;
- Command: The command written in an italic font (this part only appears in command-type cards);
- Parts: the information that explains each part of the command. The parts are divided into two types:
- Command: Which is the command itself, in this case,
pull; - Parts: All the information after the command, in this case,
remoteandbranch;
- Command: Which is the command itself, in this case,
- Information: the final part that adds more information about a command.
Filling in the new content
Since this card presents a command, you need to use the command card example from CONTRIBUTING.md and fill in the information accordingly as shown below:
---
layout: post
pretitle:
title: Pulling
subtitle: changes
command: git pull remote branch
descriptors:
  - command: command to \ndowload changes
  - part1: repository from where\n to download changes
  - part2: branch to download\n changes from
info: usually both the remote and the branch can be omitted
author: "@jtemporal"
number: "050"
mermaid: true
translated: "/projects/050"
permalink: "/en/050"
lang: "en"
pv:
  url: "/en/049"
  title: "#049 git merge source target"
nt:
  url: "/en/051"
  title: "#051 git commit --allow-empty"
---

{% include mermaid-graphs.html %}
Note that it was necessary to change the variables title, subtitle, command, descriptors and their sub-variables, info, number. And add mermaid: true.
The other variables layout, translated, permalink, lang, pv and sub-variables, nt and sub-variables, will be the ones existing in the original file and do not need to be changed.
Finally, it is necessary to replace the content of the card that comes after the front matter and place {% include mermaid-graphs.html %}. This line will ensure the rendering of the content you just filled in.
Tips for migrating cards:
- Pay attention to line breaks, for a card to be readable it may be necessary to make line breaks different from those seen in the original cards. You will be able to check this in the next section.
- Each card has a table with the description of the parts, use this table to facilitate your contribution.
5. Run the site and check the changes
Since you are using a new Codespace, you will need to install the dependencies before running the site. Start by installing the dependencies:
bundle install
Next, run the site:
bundle exec jekyll s
This command will build the site and allow you to check the adjustments you just made.
When the site is running, a pop-up will appear in the lower-left corner of your Codespaces asking if you want to open the site preview.

Click Open in Browser to open a new tab with the site running in your Codespace. Navigate to the card you modified to see the changes.
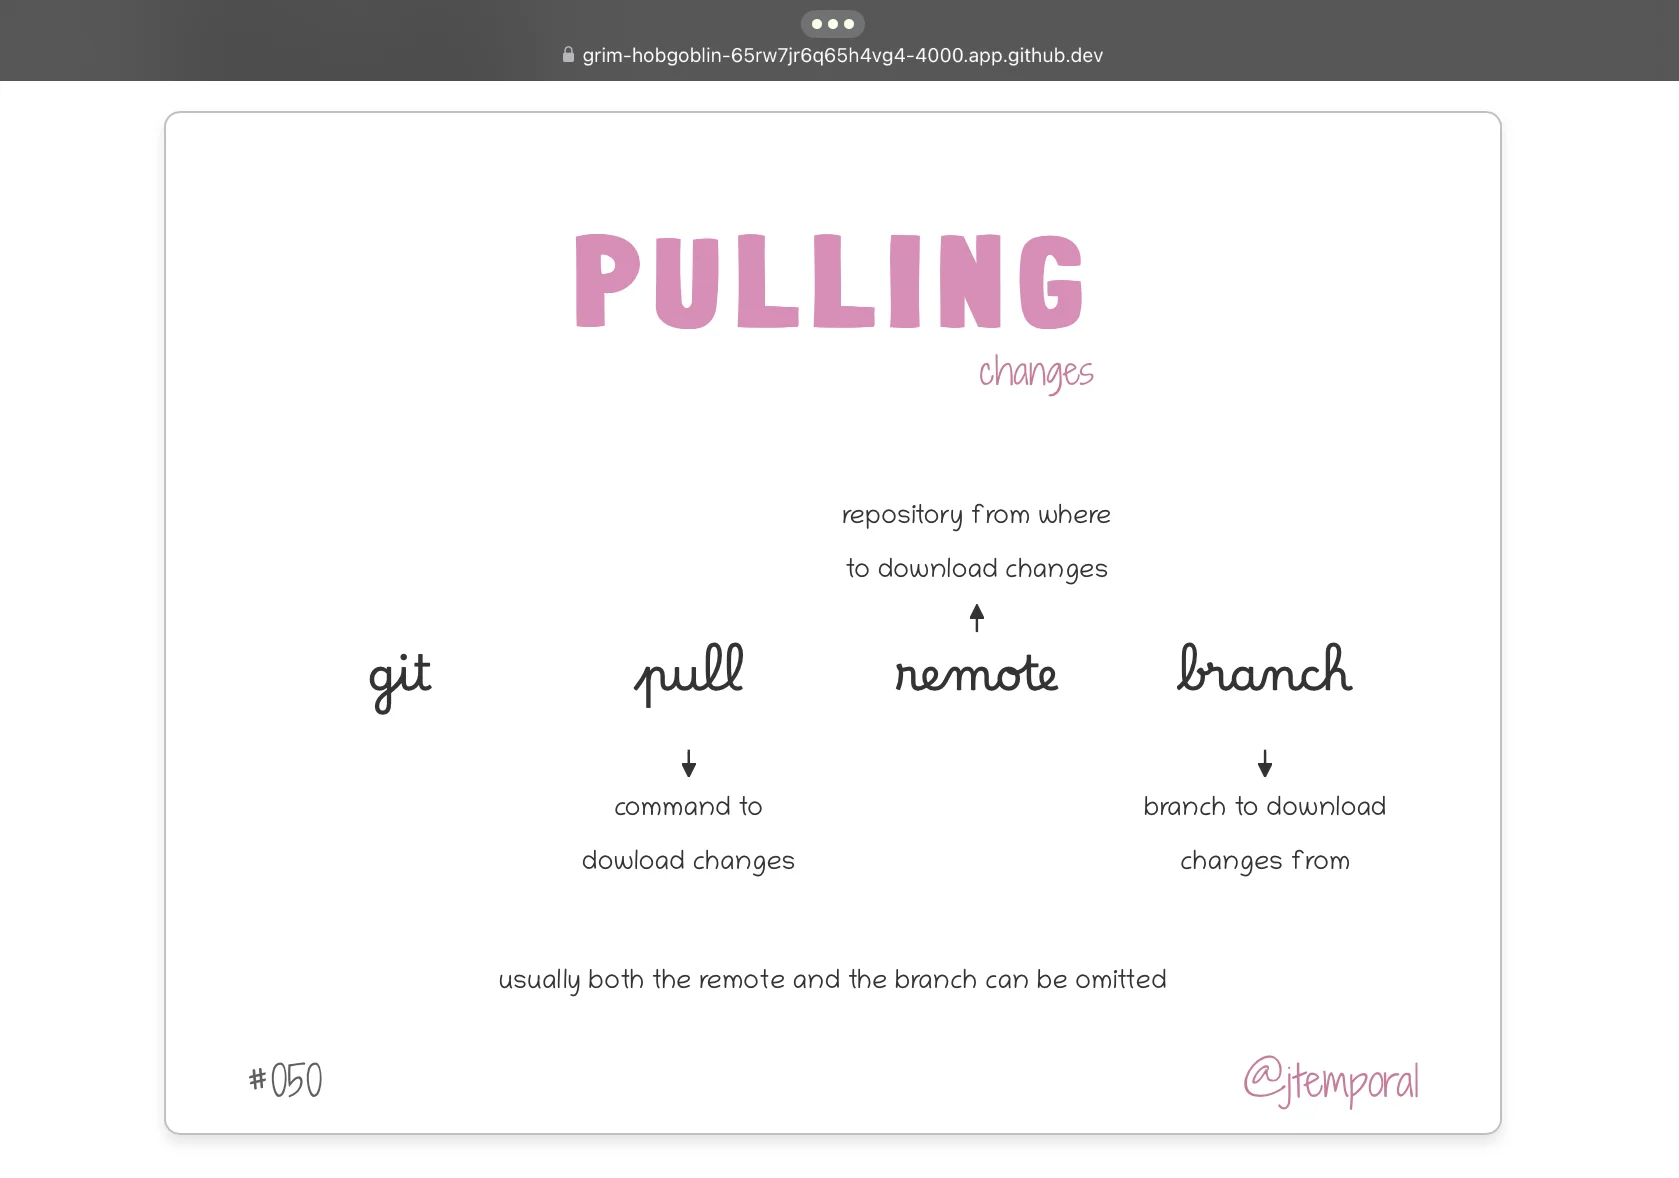
After confirming that the card is rendering correctly and the information is readable, you can proceed with your pull request.
Note that if you have difficulties rendering the card and need help, you can always open an issue to ask for assistance or a pull request with “WIP” status and describe the problem you are encountering. This follows the best practice of getting early feedback and adjusting your contributions accordingly.
6. Submit the pull request
Now that everything is in order, it’s time to submit your contribution.
Commit the changes
First, add the changes to staging:
git add en/_posts/2023-08-04-050.md
Here it is important to add only the modified file. And now commit:
git commit -m "Migrates card 050"
Remember to change the message between quotes to describe the changes you are making.
Push the branch
With the commit done, it is necessary to publish the changes with the push. Since this is the first time we are publishing changes, we need to set up the branch on the upstream using the -u option:
git push -u origin jtemporal-fix-116
When the push is completed, a link to create the pull request will appear in the terminal itself.
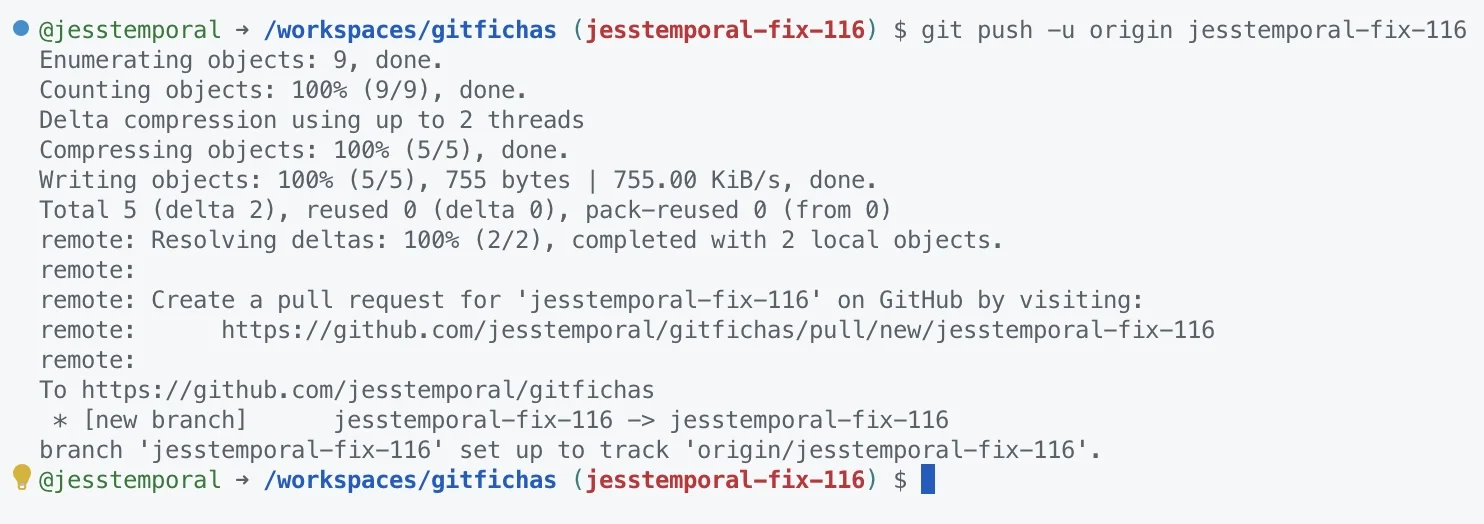
Click on it and then click “Yes” on the pop-up that asks if you want to open the pull request within Codespaces using the pull requests and issues extension.

Open the pull request and wait
This will open a left sidebar where you can adjust the pull request information as shown in the image below.
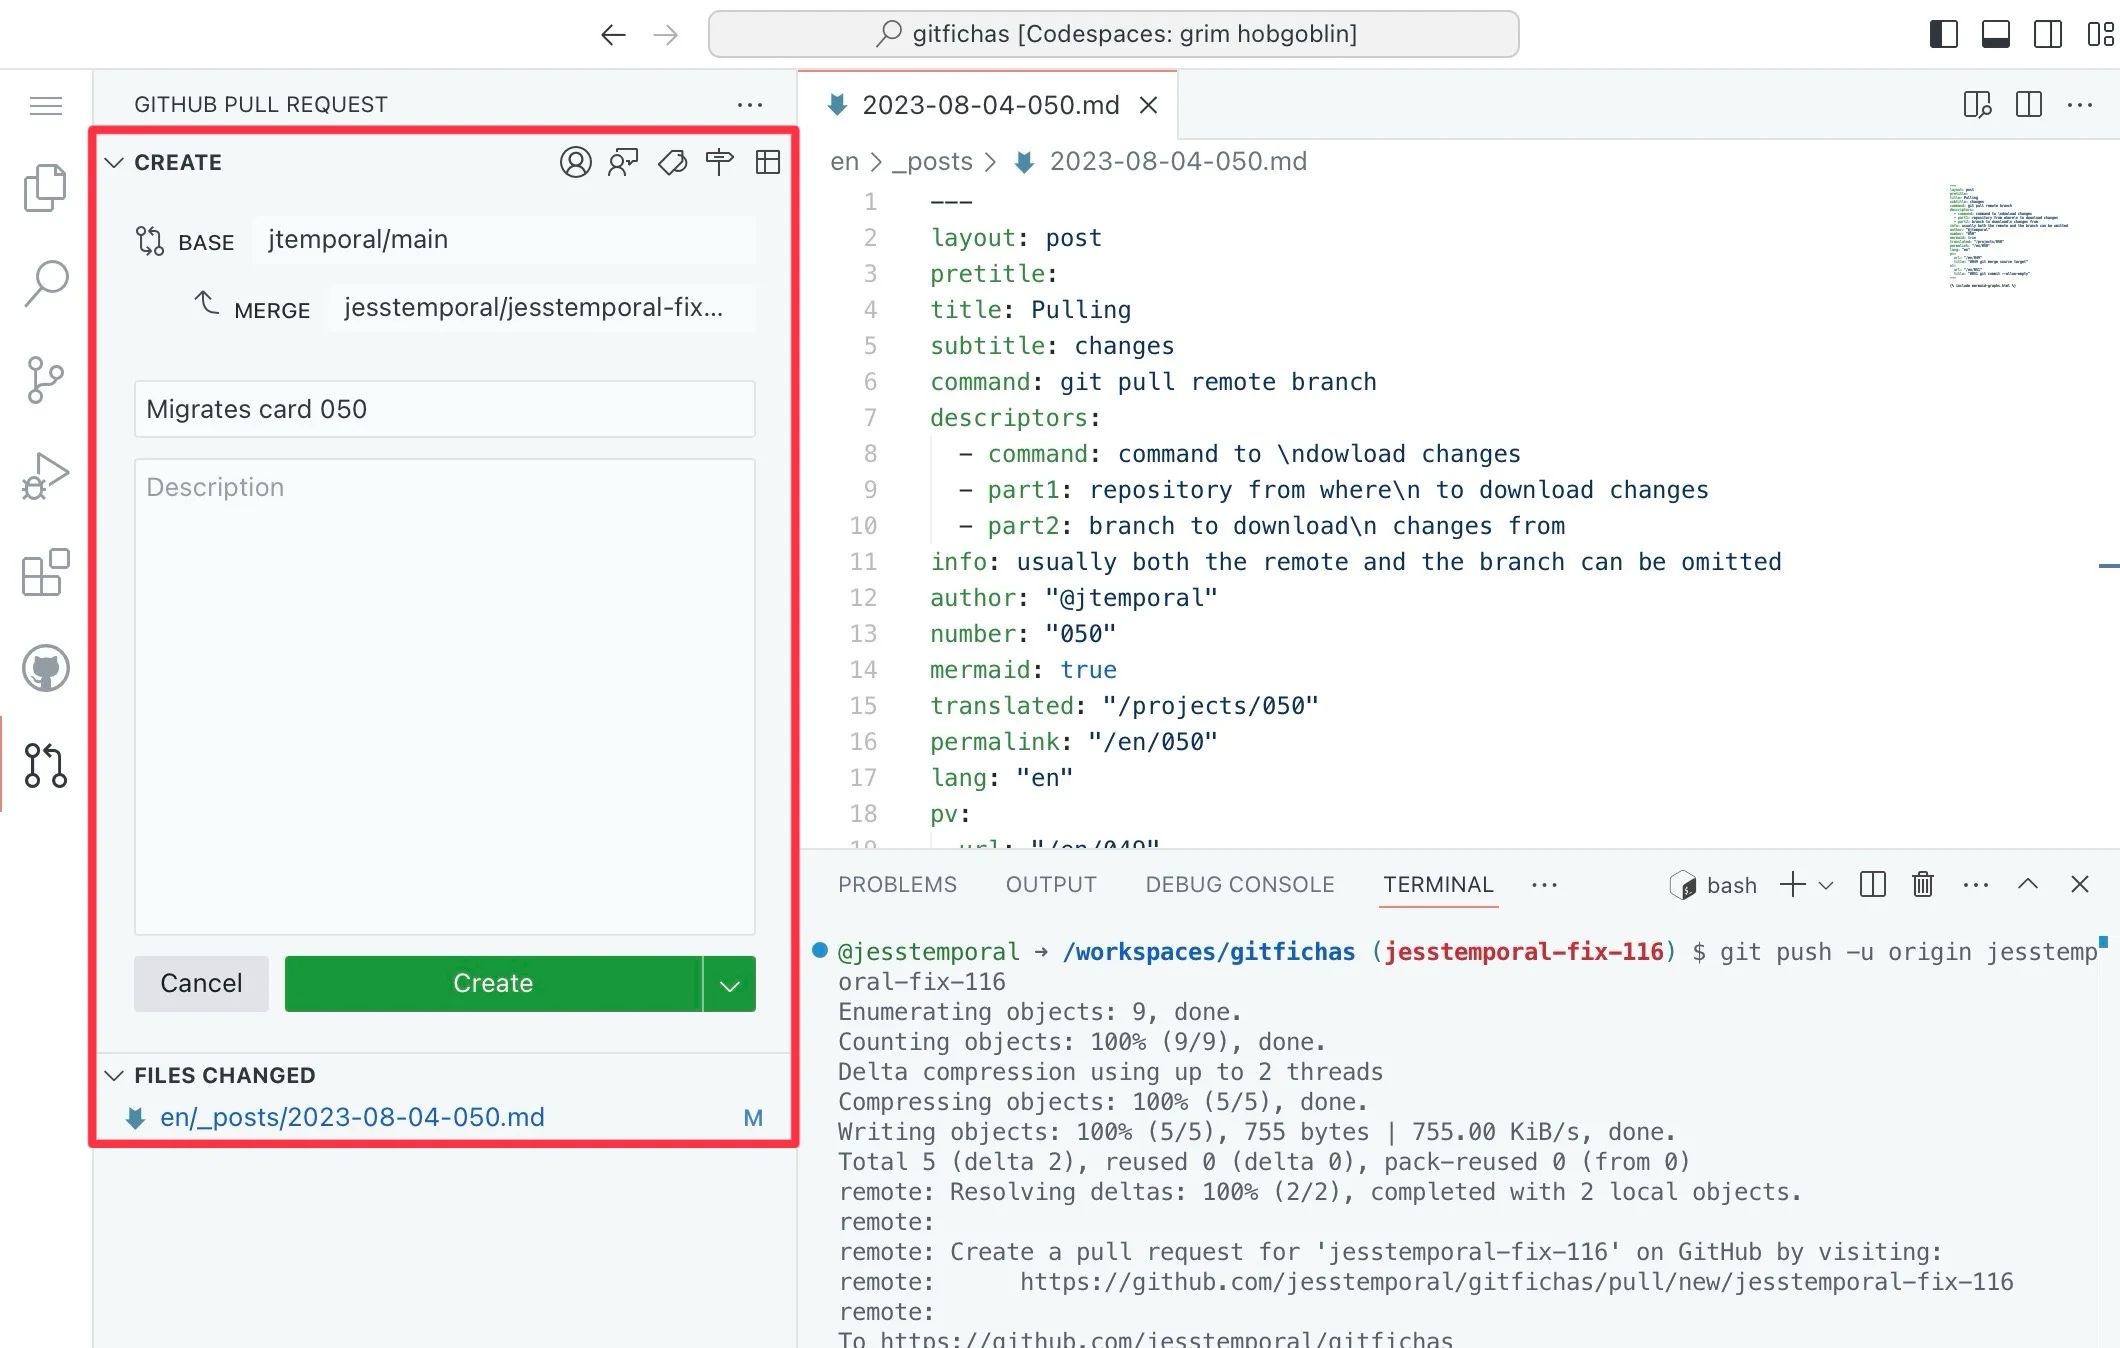
You can, for example, add a description of the changes and connect your pull request to the issue it resolves using magic words. Now you just have to wait for the review and merge. 🎉 🎉 🎉
Pull requests review
Now this part does not depend only on you. After submitting your pull request, the person or people who maintain the project need to review your contribution. From now on, things happen on the original repository page where the pull request exists.
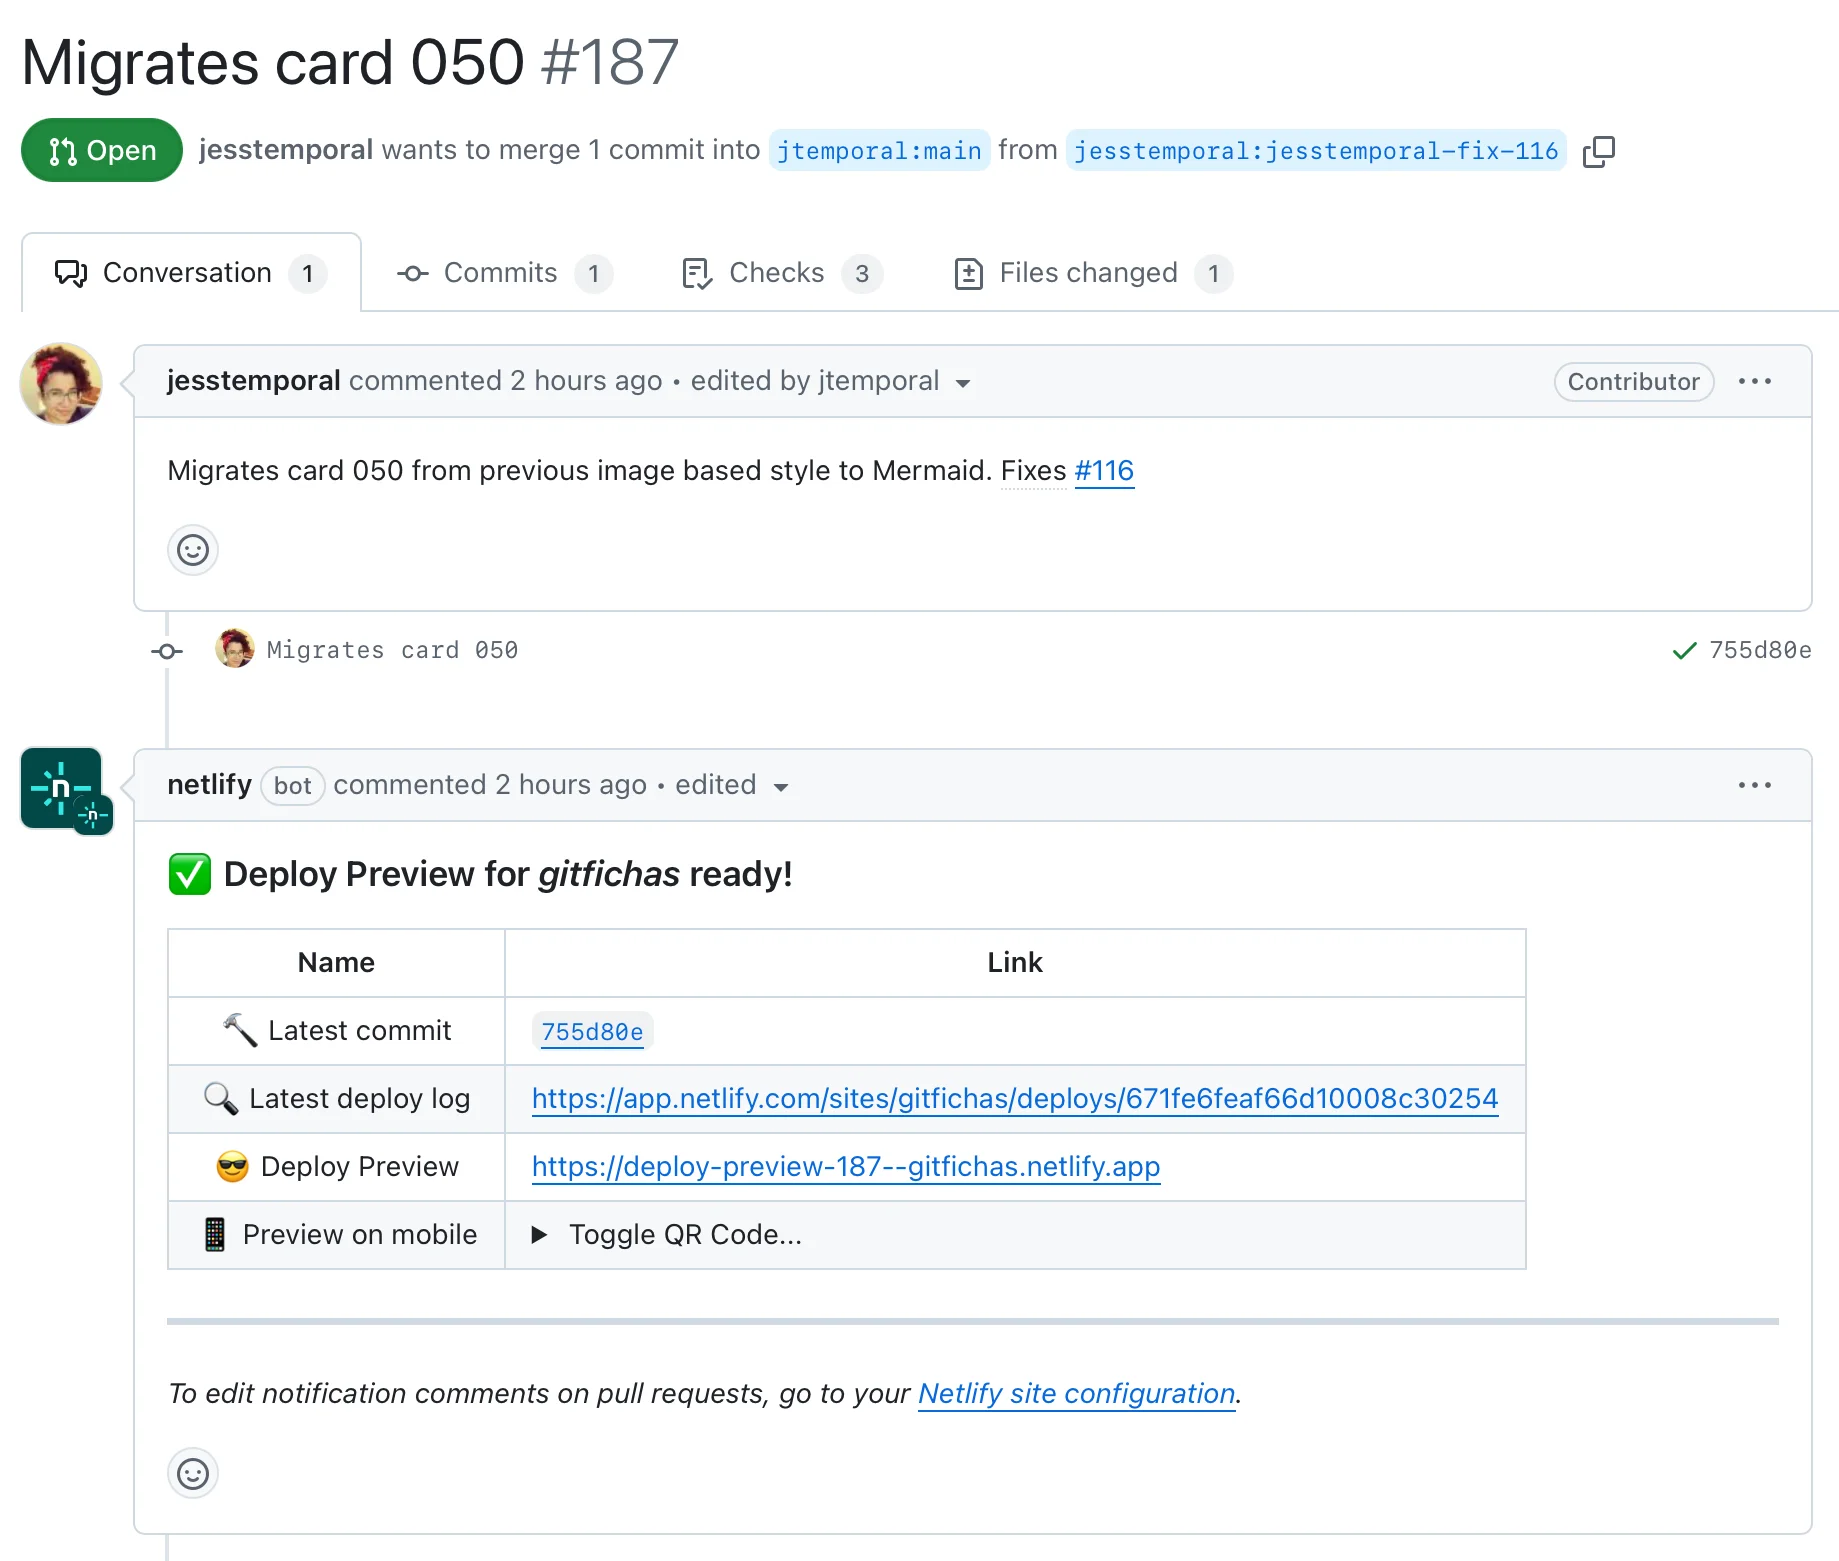
As a final check, you can use the “Deploy Preview” to see the changes you made this time in the preview generated by Netlify. It should not be different from what you saw when running the site earlier, but it is always good to double-check.
Other projects may or may not have similar preview environments. And now the project maintainers come in to review your contribution.
After reviewing, maintainers may request changes from you or make changes to your pull request to be able to merge. It is your responsibility to check and make the requested changes.
Once the pull request meets expectations, maintainers will approve and merge it, and then the changes should go live in the next site build. In the case of GitFichas, this will happen automatically via GitHub.
And that’s it, congratulations, you just made your contribution.
Recap
In most cases, following the set of steps described in this blog post will help you make quality contributions, so to recap: After choosing an issue to work on and familiarizing yourself with the project’s contribution guide, you need to follow the steps below.
- Fork the repository;
- Create a new branch;
- Start the Codespace;
- Make the changes;
- Check the changes by running the site;
- Submit the pull request.
Then, wait for the review and approval of the pull request. It is worth remembering that with great power comes great responsibility, and quality is more important than quantity. Although this pull request did not involve code, you now have the tools to make code or non-code contributions.
Now that you know how to contribute, take the opportunity to read this other post with “5 Tips to Make Your Pull Request Shine ✨”.

