The simple answer: The Cloud! Let’s see in practice what it’s like to live with your Jupyter Notebooks in the cloud? Let’s goooo!!!
A couple of years ago, while I was working on Operação Serenata de Amor, my coworkers used to say I had a Xuxa’s computer or something like that:
 Source
Nothing against Xuxa’s computers or the Pense Bem, but if you consider that when working with data science, machine learning, artificial intelligence and the like, neither Xuxa’s computer, nor the Pense Bem, and not even 4GB of RAM are going to be enough to run tasks that require large amounts of data in memory at the same time.
As a data scientist, most of the work involves “heavy” tasks. One solution to quickly work around a computer’s lack of processing capacity is using a machine in the cloud.
Advantages
But what makes the cloud so different? And what makes it such a magical place?
Today, one of the biggest challenges in data science and more specifically in the big data area is being able to process a huge amount of data in a short time and without spending much on it. And, in those moments, the cloud is your best ally.
Today, in Brazil, you can not find a light Notebook with a robust configuration, with more than 16GB of RAM and an SSD with more than 128GB, for less than 7 thousand reais. Coughing up that amount of money is beyond the financial reality of most people.
Data centers of tech giants like Digital Ocean (DO), Amazon Web Services (AWS), Google Cloud and Azure, have made low-cost access available to machines with more processing capacity than those 7 thousand reais notebooks. Plus, a connection with low bandwidth is enough to access your machine in the cloud and get your scripts running.
These available machines can, in a matter of a few hours, execute processing that would take days or even wouldn’t run at all on conventional computers.
Disadvantages
But the cloud isn’t all advantages, there are some points that still bother me when using it. For instance, all the companies that offer this kind of service with unimpeachable quality are foreign and charge in dollars. There’s still a lack of a Brazilian service that’s cheap and reliable enough to make us swap the services offered by DO and AWS for example.
I’ll still dare to say that, even though the machines are plug-and-play, some small configurations need to happen to actually guarantee the minimum usability, forcing the data scientist to wear more than one hat and, in this case, put on the SysAdmin hat too.
Jupyter in the cloud with diamonds
Okay, but let’s say you already have your beautiful little machine there on insert-your-favorite-cloud-service-here. Now what? What happens to Jupyter Notebook?
Ana Schwendler already talked about how the Serenata scientists use Jupyter Notebooks to explore data and validate or reject hypotheses. Normally, the notebook is run locally on the machine of whoever is programming, but when the person starts using a machine in the cloud, how does that process go?
Living in the clouds

Source
The most practical way to access a machine in the cloud is via SSH connection. SSH is a protocol that allows remote access to machines in a secure way. There are ways to establish an SSH connection using programs like PuTTY and MobaXterm, but if you have access to a terminal, you can also do this using a command, passing your user on the remote machine and the address (host) of that machine, something like:
|
|
But what is this SSH anyway and how does it work? In practice, SSH is nothing more than a secure way to log into a computer that is not right next to you and it works like a key and a lock. When you’re going to enter your house, normally you have to unlock the lock, and SSH works exactly the same way, you have a pair of files that are called keys and they play the role of the house key and lock.
So, instead of logging in traditionally with user and password, you can use SSH to connect to your machine in the cloud. All that’s needed is that the server has your lock (public key) and that you have the key (private key) on your local machine. For those using programs like the ones I mentioned before, those programs take care of managing these keys for you.
On a Linux server, the default place to find the locks is the authorized_keys file inside the .ssh folder. The cool part is that a single machine can have several public keys inside this file, so the whole team that needs to access that machine can. This allows, for example, resource sharing among team members, making the costs of running heavy tasks even cheaper.
These days, since I work from a Windows computer, but being familiar with Linux, I use Git Bash, a Bash terminal distributed with the Git installation and very useful ❤. Accessing the machine in the cloud via command line works for me, but if you prefer to use programs, feel free, whatever floats your boat, and you should pick whichever is more comfortable for you 😉. From here on I’m going to show how to use the terminal to do what we need. So, to access a machine using the terminal just do the following:
|
and there you are up in the clouds 😉
Let’s understand the command:
ssh: is the program for establishing an SSH connection;jessicatemporal: is my access user on the machine up in the cloud;34.66.48.61: is the IP address of the machine I want to access (here I’m showing you a fake IP just for illustration, okay?).
Now that you’ve accessed your machine you can run the Jupyter Notebook:
|
Notice that I passed an extra parameter there, --no-browser, which makes the Jupyter Notebook run without opening a browser.
Living on portals
When we run Jupyter Notebook on our computer, a communication channel is chosen so we can view our notebooks. This channel is known as a port and, in the Jupyter default configuration, it’s 8888. So we can access on our browser the path https://localhost:8888 and run our notebooks right?
But now Jupyter isn’t running on your local computer, so we’re going to use our SSH connection to connect one of the ports on our computer to the port on the server where Jupyter is running. For that, you use the -L argument which generates what’s known as port forwarding. Your SSH access would look something like:
|
In non-technical terms, port forwarding works like a portal.

Source
If you create a portal to somewhere you can see what’s going on in that place. That’s also how we manage to establish a communication channel and know what’s happening on the server, creating a tunnel (portal) that connects port 8080 on my local machine to port 8888 on the server:
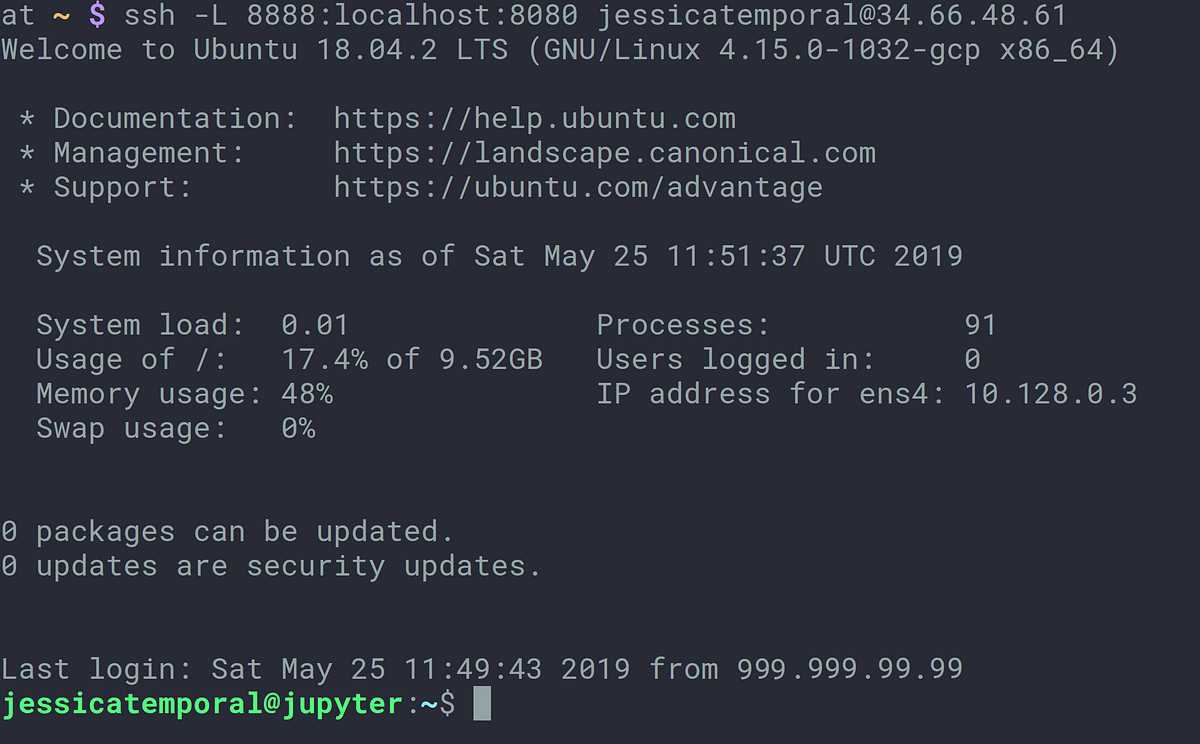
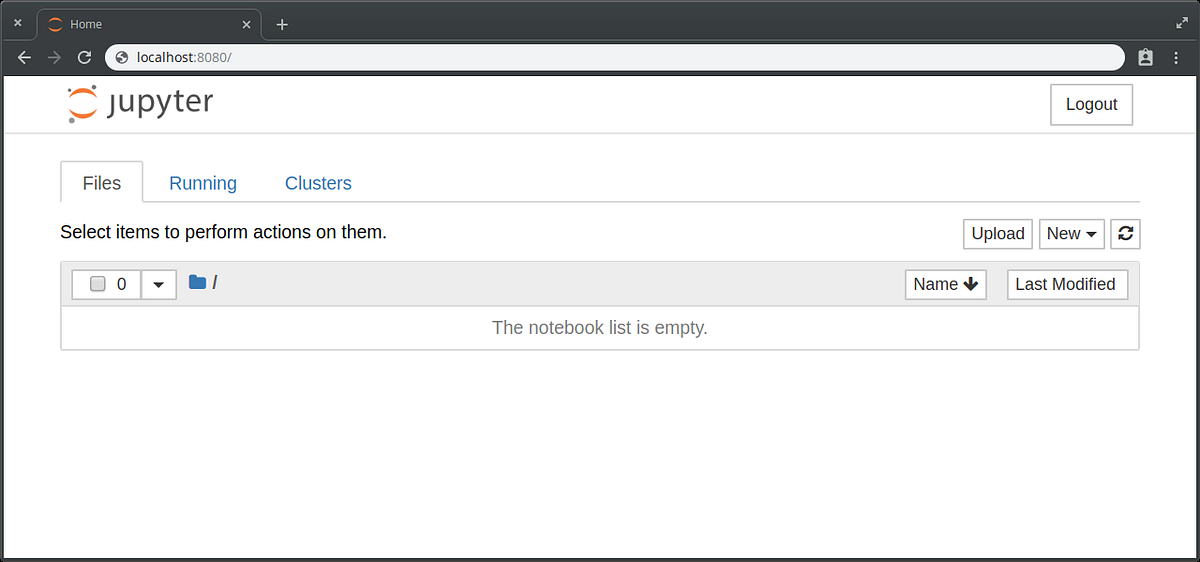
With that you can open your computer’s browser and go to https://localhost:8080 to see your notebooks:
Finally
After getting your Jupyter running in the cloud and accessing it using the tunnel, building the notebook itself doesn’t change much. You’ll keep doing your analyses like you normally do, with the small difference that now you have the power of the cloud within your reach.

Source
Now go out and conquer the cloud yourself! Xoxo.
Tips
If you want to learn more about SSH I recommend:
- Reading its manual as you need to;
- This post which is a quick SSH crash course;
- This reference infographic about SSH;
- If you want to run Jupyter on a Google Cloud instance this post is kept in my heart.